Modification ou suppression de l’utilisation d’un serveur proxy pour l’accès à internet dans votre entreprise ? Il faut donc indiquer à vos postes et serveurs Linux Ubuntu de ne plus passer par ce chemin pour accéder au réseau extérieur.
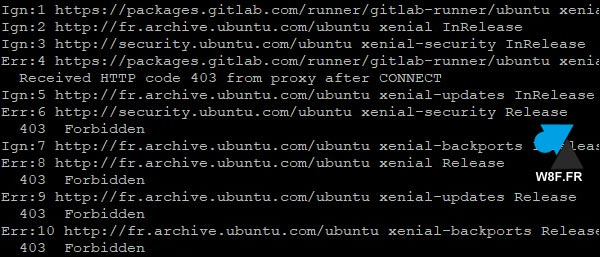
Ce tutoriel donne la solution à l’erreur rencontrée sur Ubuntu, « Received HTTP code 403 from proxy after CONNECT » ou « 403 Forbidden » lors d’une recherche de mise à jour (sudo apt update).
$ sudo apt update
Ign:1 https://packages.gitlab.com/runner/gitlab-runner/ubuntu xenial InRelease
Ign:2 http://fr.archive.ubuntu.com/ubuntu xenial InRelease
Ign:3 http://security.ubuntu.com/ubuntu xenial-security InRelease
Err:4 https://packages.gitlab.com/runner/gitlab-runner/ubuntu xenial Release
Received HTTP code 403 from proxy after CONNECT
Ign:5 http://fr.archive.ubuntu.com/ubuntu xenial-updates InRelease
Err:6 http://security.ubuntu.com/ubuntu xenial-security Release
403 Forbidden
Ign:7 http://fr.archive.ubuntu.com/ubuntu xenial-backports InRelease
Err:8 http://fr.archive.ubuntu.com/ubuntu xenial Release
403 Forbidden
Err:9 http://fr.archive.ubuntu.com/ubuntu xenial-updates Release
403 Forbidden
Err:10 http://fr.archive.ubuntu.com/ubuntu xenial-backports Release
403 Forbidden
Supprimer le proxy système Ubuntu
1. Ouvrir un Terminal ou une connexion distante par SSH.
2. Ouvrir le fichier suivant :
sudo vi /etc/environment
3. Commenter (ou effacer) la ligne http_proxy :
#http_proxy="http://192.168.0.254:8080/"
4. Enregistrer et quitter.
5. Redémarrer le Network manager :
sudo systemctl restart NetworkManager.service
6. Mais l’erreur « 403 » continue de s’afficher à l’écran.
Supprimer le proxy APT sous Ubuntu
Puisque la première opération ne suffit pas, il faut également modifier un fichier utilisé par apt.
1. Toujours dans le Terminal ou via SSH, ouvrir le fichier de conf suivant :
sudo vi /etc/apt/apt.conf
2. Commenter (ou supprimer) la ligne relative au proxy :
#Acquire::http::Proxy "http://192.168.0.254:8080/";
3. Enregistrer et quitter.
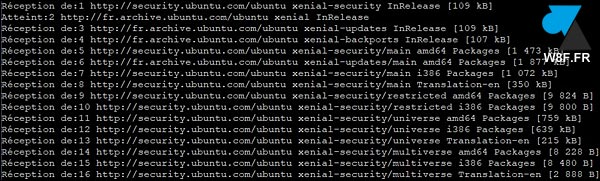
4. Refaire un sudo apt update pour constater que la recherche de mises à jour s’effectue correctement.
$ sudo apt update
Réception de:1 http://security.ubuntu.com/ubuntu xenial-security InRelease [109 kB]
Atteint:2 http://fr.archive.ubuntu.com/ubuntu xenial InRelease
Réception de:3 http://fr.archive.ubuntu.com/ubuntu xenial-updates InRelease [109 kB]
Réception de:4 http://fr.archive.ubuntu.com/ubuntu xenial-backports InRelease [107 kB]
Réception de:5 http://security.ubuntu.com/ubuntu xenial-security/main amd64 Packages [1 473 kB]
Réception de:6 http://fr.archive.ubuntu.com/ubuntu xenial-updates/main amd64 Packages [1 877 kB]
Réception de:7 http://security.ubuntu.com/ubuntu xenial-security/main i386 Packages [1 072 kB]
Réception de:8 http://security.ubuntu.com/ubuntu xenial-security/main Translation-en [350 kB]
Réception de:9 http://security.ubuntu.com/ubuntu xenial-security/restricted amd64 Packages [9 824 B]
Réception de:10 http://security.ubuntu.com/ubuntu xenial-security/restricted i386 Packages [9 800 B]
Réception de:11 http://security.ubuntu.com/ubuntu xenial-security/universe amd64 Packages [759 kB]
Réception de:12 http://security.ubuntu.com/ubuntu xenial-security/universe i386 Packages [639 kB]
Réception de:13 http://security.ubuntu.com/ubuntu xenial-security/universe Translation-en [215 kB]
Réception de:14 http://security.ubuntu.com/ubuntu xenial-security/multiverse amd64 Packages [8 228 B]
Réception de:15 http://security.ubuntu.com/ubuntu xenial-security/multiverse i386 Packages [8 480 B]
11,4 Mo réceptionnés en 3s (2 897 ko/s)
Lecture des listes de paquets... Fait
Construction de l'arbre des dépendances
Lecture des informations d'état... Fait
226 paquets peuvent être mis à jour. Exécutez « apt list --upgradable » pour les voir.